Ins and Outs of HTML
Get to know HTML use and format
|
As you learned in the Intro to Web, HTML is everything on the page you can see, including headings, paragraphs, images, or buttons.
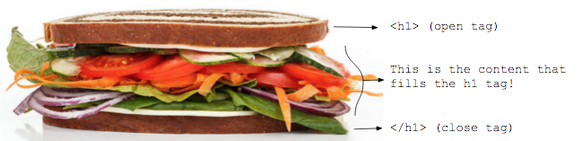
There are actually a lot of similarities between a HTML page and a google doc. Just like in a google doc, HTML allows you to add elements to the page like text, buttons, headings, paragraphs, links, and photos. The big difference between the two is in how you do it. In google docs, to add a picture to your page you click “insert” and then “image” and then you upload a picture from your computer. In HTML, instead of clicking to add a photo you have to use the html tag for photo by typing it using HTML code. Similarly, if you want to make a Heading in google docs, you highlight the text you want for the heading and click “Normal text” and then switch it to “Heading 1.” In HTML, you have to use the HTML tag for Heading 1 by typing it onto the page in HTML code. So now you are beginning to get what HTML can do... but how do you do it? Writing HTML codeWriting an HTML tag is kind of like making a sandwich. That sounds pretty weird, but bear with me. There are three main things you need for a sandwich:
HTML is made of lots of different tags. You combine tags to make a webpage. Different kinds of tags include text, headings, images, buttons, etc.
To put a tag on your page, you’ll need to start with an open tag. (That’s the top layer of bread.) Each tag has a specific letter/name, which is represented by the letter between the < and >. The element for normal text is a p tag, and so its open tag it looks like this: <p>. The close tag that matches <p> is </p>. (Notice how the open and close tag are different? The close tag has a / right after the first <.) A full p-tag looks like this: <p></p> Okay. How about you try it out? To start, you’re going to need to go to jsbin.com and make an account if you don’t have one. After you’ve created an account: 1) Copy and paste the above p-tag into JSBin between the <body> and </body> tags. 
What do you see in the output? Nothing, right? That’s because we have the p-tag on the page, but it’s empty. (It’s a bread sandwich -- there’s nothing inside to make it interesting!)
The words that you want to write on the page go between the open and close tag: <p>This is a p tag.</p> 2) Go back to JS bin and add text to your <p> tag. Most other elements will work the same way as the <p> tag. For example, if you want to make a button that says click me, the code will look like this: <button>Click Me!</button> 3) Try making a button in JsBin! (Clicking the button won’t do anything yet. We’ll work on that once we’re using JavaScript.) If you want to make a heading for your page with your name, it will look like this: <h1>Your Name</h1> You notice that in every example, there is the open tag, close tag, and content in the middle, right? Great. Let’s look at this picture of HTML code: 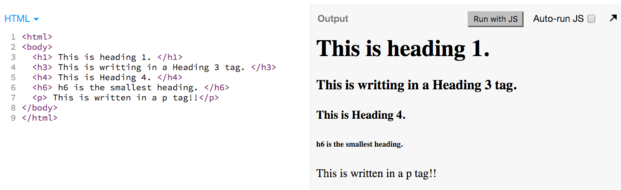
Does it make a little more sense now? Now that you’ve mastered the format let’s move on to attributes, which will allow you to provide more specific information about an element.
Attributes So, we’re going to stop talking about sandwiches now. Let’s pretend that a single HTML tag is like a person. Attributes are just ways to describe the person in more detail, like their name, their hair color, their eye color, etc. Attributes provide additional information about an element. They must be written in the open tag. Attributes are formatted like this: attribute="value". So if your name was Jake, we could use name=”Jake” as an attribute to describe you. One attribute that you’ll use a lot is the id attribute. It allows you to give your element a name that can be used to identify it in CSS and JavaScript. So if you were an HTML element named Jake, we’d actually say id=”Jake” because id’s are the names of HTML elements. To set the id of a <p> tag, use the code highlighted in yellow: <p id="elementName">This is a p tag with an id of elementName!</p> To have an image on your page, you’ll need to use an <img> tag. To specify which picture shows up, use the src attribute (src stands for source of the image.) 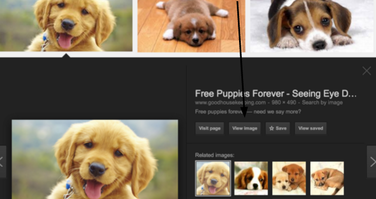
To choose a picture, choose an image in google images right-click it and copy the photo’s address. Paste that address as the image’s source as we do below:
<img id="cuteDog" src="http://cdn.petpictures.xyz/2015/07/20/cute-dog-pics-with-words.jpg"></img> 1) Copy and paste the above img tag into JSBin. 2) Can you find an image on google (using the instructions above) and put it onto your page below this image? There are hundreds of different attributes. Some attributes only work with specific elements (like src), and some (like id) work for all elements. |
